|
Goose Crafts
Handcrafted items made by you for your geese, with your goose feathers, or with a goose theme for around your home.
TOYS, TREATS, WREATHS, STUFFED GOOSE OR GEESE, JEWELRY AND OTHER CRAFTS FOR YOUR TO MAKE. If you have a goose craft to share, that you would like to see Highlighted on this page, with full credit to you, PLEASE send it to marna@housegoose.com with a photo and instructions for crafting the item. We look forward to hearing from you.
This is easy and inexpensive to make and only take a few minutes. No sewing, no taping, no welding. Just cut and tie.
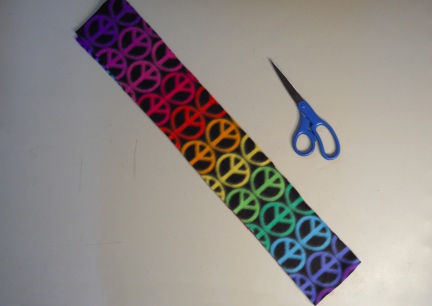
You can purchase Polar Fleece at any fabric Store. You will only need 4 to 6 inches and yes, you can ask the store to cut that amount off your favorite color or print. The store will prorate the price, so this toy will cost less then $2 for most polar fleece fabrics.
Take a good pair of scissors. With the fabric still factory folded, cut longways about 3/4" pieces. Cut one of the pieces into two pieces, one of the pieces should be approx. 8 - 10 " long. Put it to the side and do not wrap it with the other pieces.
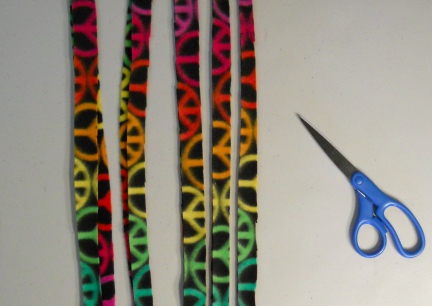
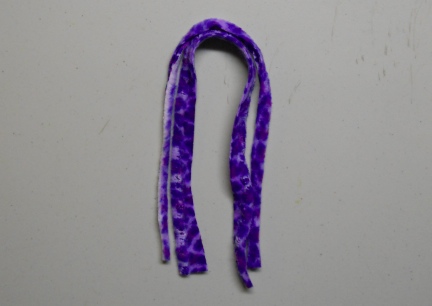
With the first end, the end of the fabric at the bottom of the inside of your hand, start wrapping the pieces loosely around your hand. If the fabric has a pattern, mix the colors strips in as you wrap so that the colors come out throughout your pom pom.

Keep wrapping until the fleece pieces are all, except the one 8 - 10" piece is wound loosely around your hand until all the pieces are used.
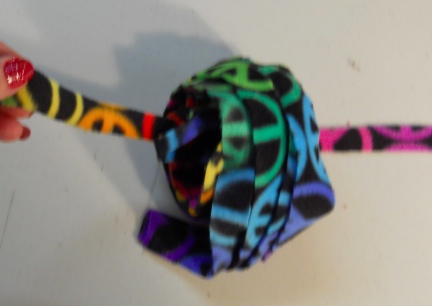
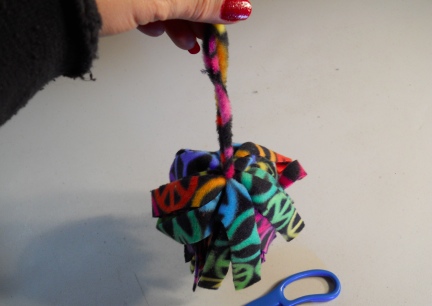
Use the short piece, the 8 - 10" piece you set aside, to tie off your Pom Pom by pushing the piece through the entire wound stripes at the top and line up so that it is middle top.
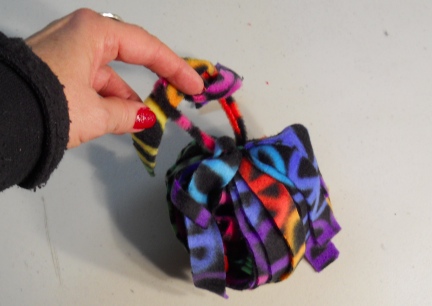
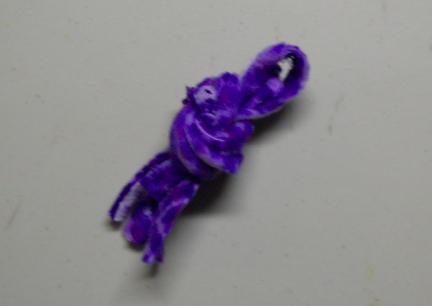
Tie your top piece in a square knot and add an extra tie through (tie off three times). Pull very tight when tying the knots so that the pieces when cut will not pull through.
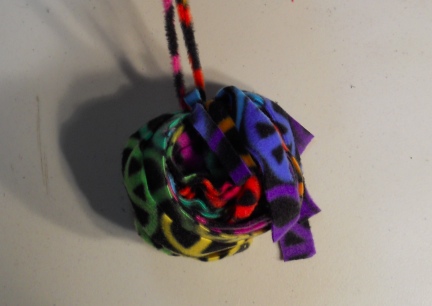
This is what your Pom Pom will look like before cutting. Put your fingers back into the loops and make sure they are all turned the same way for easy cutting.
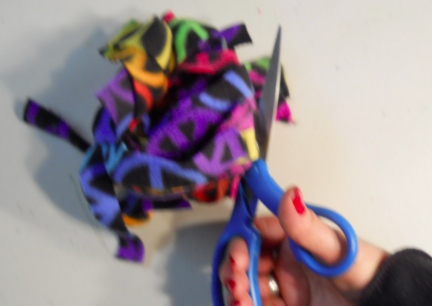
Carefully put the scissors into the loops and pull the scissors downward to make sure you are at the middle of the bottom before cutting. Keep your hands and fingers away from the scissors as you cut.

This is what the Pom Pom will look like, kinda flat, when first cuts.
Fluff out the Pom Pom and hang, perhaps with a looped rubber bang, from the back of a chair or other area. Your housegoose, (houseduck or housechicken, or cat/kitten) will spend a lot of time playing with this toy. If they ignore it, give it a pull and watch them go for it.
Goose Outfit for Live or Lawn Geese I have information and (will have) patterns for outfit, clothes, costumes for your live or plastic/concrete lawn geese on the Lawn Goose page.
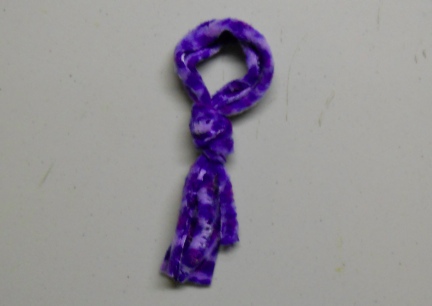
Easy Knot Goose Toy For Hanging 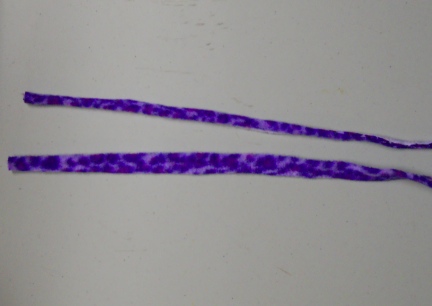
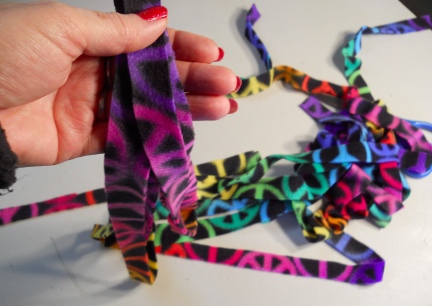
This Toy is so easy and fast to make, if you can not do this one, please do not keep a pet. <grin> You need two pieces of polar fleece. I used the selvage edges from making Goose Diaper Holders. But you can cut two pieces from fabric that are approx 3/4" - 1" thick. Any length from 8" - 21". These are 18" long.
Double the lengths over in half as shown. If it is off center, still not a problem.
Loop a know in the top so that you can hang it from somewhere fun your housegoose can play. You can use any type of hanger, one strap thick. A piece of elastic would be very appreciated by the goose it is being made for.
Tie your knot type. It is ready to go.
Stuffed Crocheted Goosey Grandma 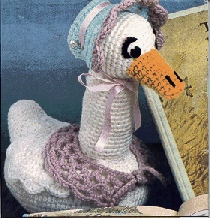
SIZE: 12" tall
MATERIALS:
4-ply yarn
3 1/2 oz white
Small amount orange
Small amount rose
Small amount aqua
Fiberfill
6" x 4" pasteboard
Small amount of felt in Pink, White and Black
18" of 3/8" wide pink satin ribbon
Glue
Yarn needle
Crochet hook size G/6 (4.50inm)
GAUGE: 4 sts=1"; 4 sc rows=1"
HEAD
Rnd 1: With white yarn, ch 2, work 6 sc in 2nd ch from hook, do not join, use a yarn marker. (6)
Rnd 2: Work 2 sc in each sc around. (12)
Rnd 3: (Sc in next st, 2 sc in next st) 6 times. (18 )
Rnd 4: (Sc in next 2 sts, 2 sc in next st) 6 times. (24)
Rnd 5: (Sc in next 3 sts, 2 sc in next st) 6 times. (30)
Rnd 6: Sc in each st around.
Rnd 7: (Sc in next 4 sts, 2 sc in next st) 6 times. (36)
Rnds 8-12: Rep Rnd 6.
Rnd 13: (Sc in next 4 sts, dec 1 sc over next 2 sts) 6 times. (30)
Rnd 14: Rep Rnd 6.
Rnd 15: (Sc in next 3 sts, dec 1 sc over next 2 sts) 6 times. (24)
Rnd 16: (Sc in next 2 sts, dec 1 sc over next 2 sts) 6 times. (18 ) Stuff firmly with fiberfill.
Rnd 17: (Sc in next st, dec 1 sc over next 2 sts) 6 times. (12)
Rnd 18: (Dec 1 sc over next 2 sts) 6 times, sl st in next st, fasten off. (6)
NECK
Beg at top of the neck, with white yarn, ch 24, join to form a ring, ch 1.
Rnd 1: Sc in each ch around, do not join, use a yarn marker. (24)
Rnds 2-19: Sc in each st around.
Rnd 20: (Sk 2 sts, work 3 dc in next st, ch 1, work 3 dc in same st, sk 2 sts, sc in next st) 4 times, sl st to next st, fasten off.
Stuff firmly with fiberfill. Place head on top of neck and stitch in place.
BODY
Beg at center bottom of body, with white yarn, ch 12.
Rnd 1: Sc in 2nd ch from hook, sc in next 9 chs, work 3 sc in next ch, working on opposite side of foundation ch, sc in next 9 chs, work 2 sc in next ch, do not join rnds, use a yarn marker. (24)
Rnd 2: Work 2 sc in next st, sc in next 9 sts, (2 sc in next st) 3 times, sc in next 9 sts, (2 sc in next st) 2 times. (30)
Rnd 3: Sc in next st, 2 sc in next st, sc in next 9 sts, (sc in next st, 2 sc in next st) 3 times, sc in next 9 sts, (sc in next st, 2 sc in next st) 2 times. (36)
Rnd 4: Sc in next 2 sts, 2 sc in next st, sc in next 9 sts, (sc in next 2 sts, 2 sc in next st) 3 times, sc in next 9 sts, (sc in next 2 sts, 2 sc in next st) 2 times. (42)
Rnd 5: Sc in next 3 sts, 2 sc in next st, sc in next 9 sts, (sc in next 3 sts, 2 sc in next st) 3 times, sc in next 9 sts, (sc in next 3 sts, 2 sc in next st) 2 times. (48 )
Rnd 6: Sc in next 4 sts, 2 sc in next st, sc in next 9 sts, (sc in next 4 sts, 2 sc in next st) 3 times, sc in next 9 sts, (sc in next 4 sts, 2 sc in next st) 2 times. (54)
Rnd 7: Sc in next 5 sts, 2 sc in next st, sc in next 9 sts, (sc in next 5 sts, 2 sc in next st) 3 times, sc in next 9 sts, (sc in next 5 sts, 2 sc in next st) 2 times. (60)
Rnd 8: Sc in each st around.
Rnd 9: Working in back lps only for this rnd, sc in each back lps around.
Rnd 10: Hdc in each st around.
Rnd 11: (Hdc in next 4 sts, 2 hdc in next st) 12 times. (72)
Rnd 12: Rep Rnd 10.
Rnd 13: (Hdc in next 5 sts, 2 hdc in next st) 12 times. (84)
Rnds 14 & 15: Rep Rnd 10.
Rnd 16: (Hdc in next 6 sts, 2 hdc in next st) 12 times. (96)
Rnd 17: Rep Rnd 10.
Rnd 18: (Hdc in next 6 sts, dec 1 hdc over next 2 sts) 12 times. (84)
Cut pasteboard in an oval to fit into the bottom of the body and glue in place. Allow to dry completely.
Rnd 19: (Hdc in next 5 sts, dec 1 hdc over next 2 sts) 12 times. (72)
Rnd 20: (Hdc in next 4 sts, dec 1 hdc over next 2 sts) 12 times. (60)
Rnd 21: (Hdc in next 3 sts, dec 1 hdc over next 2 sts) 12 times, (48 )
Rnd 22: (Sc in next 6 sts, dec 1sc over next 2 sts) 6 times. (42)
Rnd 23: (Sc in next 5 sts, dec 1 sc over next 2 sts) 6 times. (36)
Rnd 24: (Sc in next 4 sts, dec 1 sc over next 2 sts) 6 times. (30) Stuff firmly with fiberfill.
Rnd 25: (Sc in next 3 sts, dec 1 sc over next 2 sts) 6 times. (24)
Rnd 26: (Sc in next 2 sts, dec 1 sc over next 2 sts) 6 times. (18 )
Rnd 27 (Sc in next st, dec 1sc over next 2 sts) 6 times. (12)
Rnd 28: (Dec 1 sc over next 2 sts) 6 times, sl st in next st, fasten off. (6)
Position bottom of neck over front of body. Stitch in place.
TAIL
Beg at top of tail, with white yarn, ch 6.
Rnd 1: Sc in 2nd ch from hook, sc in next 3 chs, 2 sc in next ch, working on opposite side of foundation ch, sc in next 3chs, 2sc in next ch,do not join, use a yarn marker to mark rnds (12)
Rnd 2: Work 2 sc in next st, sc in next 3 sts, (2 sc in next st) 3 times, sc in next 3 sts, (work 2 sc in next st) 2 times. (18 )
Rnds 3 & 4: Sc in each St around.
Rnd 5: Sc in next st, 2 sc in next st, sc in next 3 sts, (sc in next st, 2 sc in next st) 3 times, sc in next 3 sts, (sc in next st, 2 sc in next st) 2 times. (24)
Rnds 6-8: Sc in each st around.
Rnd 9: Sc in next 2 sts, 2 sc in next St, sc in next 3 sts, (sc in next 2 sts, 2, sc in next St) 3 times, sc in next 3 sts, (sc in next 2 sts, 2 sc in next St) 2 times. (30)
Rnd 10: Sc in each St around, sl st in next St, fasten off.
Stuff firmly with fiberfill. Stitch to top back of body.
WINGS (make 2)
Row 1: With white yarn, ch 61, sc in 2nd ch from hook, sc in each rem ch across, ch 1, turn. (60)
Row 2: Sc in each St across, ch 1, turn.
Row 3: (Sk 2 sts, 3 dc in next st, ch 1, 3 dc in same st, sk 2 sts, sc in next st) 10 times, fasten off. Center over back in front of tail and across each side. Stitch in place.
BEAK
Rnd 1: With orange yarn, ch 6, sc in 2nd ch from hook, sc in next 3 chs, 3 sc in next ch, working on opposite side of foundation ch, sc in next 3 chs, 2 sc in next ch, do not join, use a yarn marker to mark rnds. (12) Rnds 2-5: Sc in each St around.
Rnd 6: Work 2 sc in next St, sc in next 3 sts, (2 sc in next St) 3 times, sc in next 3 sts, (2 sc in next St) 2 times. (18 )
Rnd 7: Sc in each St around.
Rnd 8: Sc in each St around, sl st in next st, fasten off.
Stuff firmly with fiberfill and stitch in place to front of head.
SHAWL
Row 1: With rose yarn, ch 76, sl st in 2nd ch from hook, sl st in next 14 chs, (ch 5, sk 2 chs, sc in next ch) 15 times, ch 1, turn.
Row 2: sl st up side of 1st lp, (ch 5, sc in next lp) 14 times, ch I turn
Row 3: sl st up side of 1st lp, (ch 5, sc in next lp) 13 times, ch 1, turn.
Row 4: sl st up side of 1st lp, (ch 5, sc in next lp) 12 times, fasten off.
Place around neck and tie ends.
BONNET
Beg at center back of bonnet, with aqua yarn, ch 2.
Rnd 1: Work 6 sc in 2nd ch from hook, do not join, use a yarn marker to mark rnds.(6)
Rnd 2: Work 2 sc in each st around. (12)
Rnd 3: (Sc in next st, 2 sc in next st) 6 times. (18 )
Rnd 4: (Sc in next 2 sts, 2 sc in next st) 6 times. (24)
Rnd 5: (Sc in next 3 sts, 2 sc in next st) 6 times. (30)
Rnd 6: Working in back lps for this rnd only, hdc in each st around, sl st in next st to join, ch 2.
Rnds 7 & 8: Hdc in each st around, join, ch 2.
Row 9: SI st in next 5 sts, ch 2, hdc in next 20 sts, ch 2, turn. (20)
Row 10: Hdc in each st across, ch 2, turn.
Row 11: (Hdc in next st, 2 hdc in next st) 5 times, (2 hdc in next st, hdc in next st) 5 times, ch 2, turn. (30)
Row 12: (Hdc in next 3 sts, 2 hdc in next st) 3 times, (2 hdc in next st, hdc in next st) 3 times, fasten off aqua, attach rose, ch 1, turn. (36)
Row 13: (Sk 2 sts, 3 dc in next st, ch 1, 3 dc in same st, sk 2 sts, sc in next st) 6 times, fasten off.
Thread ribbon up one side of Rnd 9, over the front of the bonnet and down through the other end of Rnd 9. Place on head. Tie ribbon in a bow under head.
FINISHING
From white felt, cut two eyes. Glue to front of head above beak. From black felt, cut two pupils and glue to front of eyes. From pink felt, cut two eyelids and glue to top of eyes.
From black felt, cut two eyelashes, glue to eyelids and down sides of eyes. Cut two nostrils from black felt and glue to top end of beak
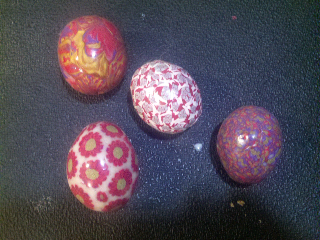
There are so many things a person, a crafty person, can do with their bird eggs. The eggs do need to be blown out (remove the inside) and that part is editable if fresh. This photo is of a craft that a HouseDuck and HouseGoose owner I know from an elist made with eggs his birds laid. He blew them out first. Here is what he said about his craft "I make jewelry and work with polymer clay. I blew my girls eggs and.covered them.with clay. Ill take a pic they are so fancy". I asked permission to highlight them here for everyone to see the beauty of his work......and great idea! I do have more ideas for egg crafts on the Goose Craft page here at this site, have a look, you might just be inspired to create a beautiful ornament of your own.
The contents of this page for "Goose Crafts" will remain under construction. Please check back. We hope that this page will be ever growing and you will send your goose crafts to us to share here on this page....and credit you of course.
-- The House Goose Team
Sun, 11 Dec 2011 13:14:42 -0500
|


 In the high plains of South Dakota, USA